This is an IKEA BROR:
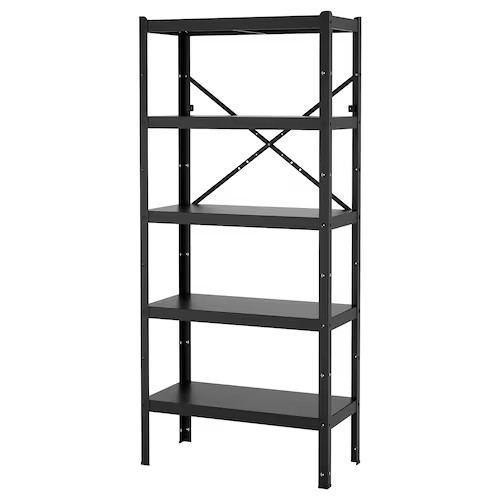
It’s a cheap shelving unit with more depth than a bookshelf and the ability to hold a lot more weight.1 Unfortunately the quality is a bit variable. Fortunately I’ve got four tricks to improve their quality massively.
The legs are made of 1mm thick, 2” right-angle channel in some sort of steel. I don’t think there’s any realistic load I could put on these shelves that will cause the legs to fail in compression. The legs aren’t the problem, it’s the rigidity of the joints.
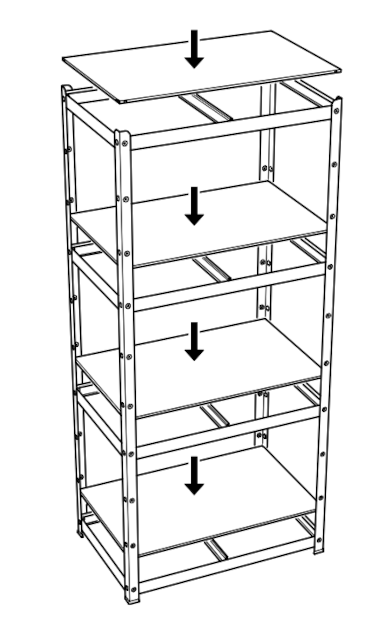
Each shelf is formed from four steel beams running between pairs of legs, and then a fifth beam that spans the middle. The shelves just rest on top of this:
Manufacturing is hard
Problem number one arises when you try to attach the beams to the legs. Each end of each beam has a cutout shaped like an upside-down keyhole that slots over a little butterfly-like shape on the legs.
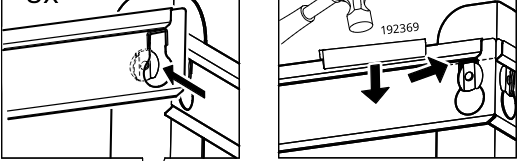
Often these fit poorly. If your instinct is to roll your eyes and blame IKEA, I’d urge you to think again. Both the keyhole and the butterfly appear to be made by stamping the metal elements. This will be extremely fast and cheap on a production line.
The keyholes are designed to have a bit of a ‘lip’ at the end, which holds them in place by friction. The problem is that it isn’t possible to control the size of this very precisely2 and you often get the result shown below.
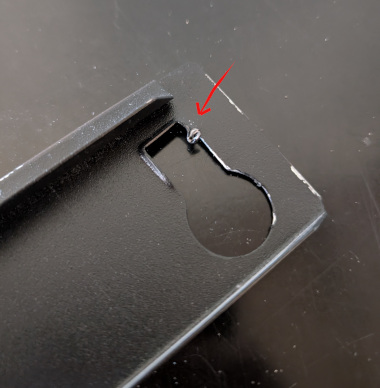
Can you see the little curl of metal that the arrow is pointing to? That’s what happens when you follow the assembly instructions with a poorly stamped keyhole. The result is that the beam doesn’t fit into place, isn’t held in place by friction, and the shelf itself doesn’t sit level. Thankfully, the solution to this is easy.
Trick 1: If a keyhole fits poorly, file the edge down until it fits.
You might be tempted to try bending the ‘butterfly’ on the vertical legs instead. In my experience that doesn’t really work - they’re too difficult to bend. If you haven’t used a file before, the main thing you need to know is that they remove material on the push, not the pull. There’s a good guide in this YouTube video from Blondihacks if you want more guidance.
Problem number two is that even if he beams install without issue, the friction holding them in place isn’t very strong. Trying to lift the BROR by a beam will usually result in the beam detatching from the legs. Filing the edge of the keyhole down actually makes this problem worse, since the fit is less snug, but that’s ok. Recommendation three (below) will fix this.
Rigidity is hard
Even if your BROR has perfectly sized cutouts and slots together like a charm, you’ll notice a tendency to wobble. Here’s a crude sketch of the main ways it can move:
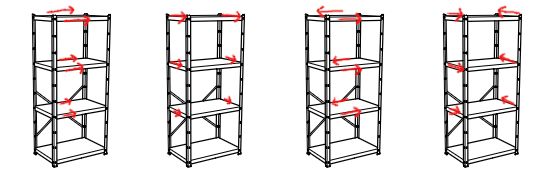
The first mode is the one drawn on the far left, which you could make happen by standing in front of your BROR and grabbing the top and shifting it left and right. The design does actually do something very effective to stop this, it’s the ‘X’ shaped brace installed at the back. You should definitely make sure that is installed.
The second mode, where you grab the top and pull it towards you or push it away from you isn’t really dealt with effectively in the base design. Bolting it to the wall is quite an effective way to stop this, and I’m a bit surprised they don’t include a bracket to do so.
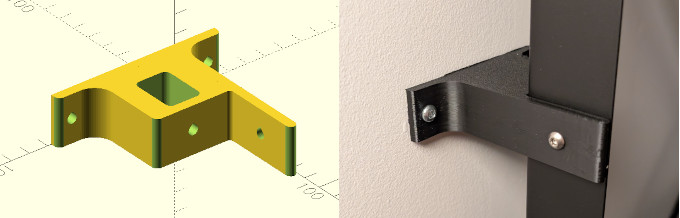
Trick 2: Bolt them to the wall.
You could use any bracket for this, but I made 3D-printed ones that were sized to fit the BROR exactly3.
The final two modes, which I would call “shearing within the plane of the shelf” aren’t really prevented by bolting the shelves to the wall.4 They’re also pretty unlikely to result in the shelf collapsing, since it’s hard to deform the shelves very far in these directions. I think these really only matter if you’re planning to use your shelves for something with moving parts, like a 3D printer. But since I am, they matter to me.
These final two modes fundamentally arise because nothing forces the beams of the shelf to meet at a right angle. The solution to this is to add a rigid bracket at the corner that enforces this. The idea of a corner bracket to enforce this is not original to me (this is the other I’m aware of), but I do think I’ve improved the design just a little with this version.
Trick 3: Reinforce the points where beams meet with 3D printed right-angle brackets.
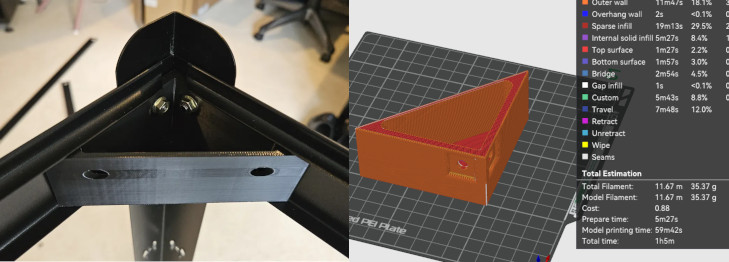
These changes were heavily inspired by this excellent blog post about designing for 3D printing. I’ve reduced the size of the ‘void’ in the original design5, rounded the corners to support faster printing6, and used teardrop-shaped holes.
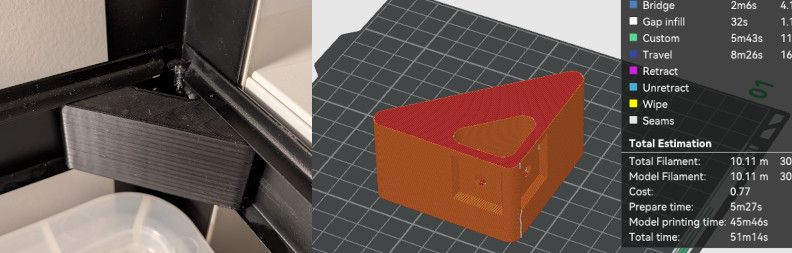
This new design prints faster and uses less filament. (Though it is also a little smaller, so I’m not sure that this isn’t what makes the difference.)
After installing these the shelves immediately feel more robust. You don’t need to install them on every shelf deck. I found that doing two out of four made a big difference to the subjective feel of how sturdy the shelves were. Installing these brackets also has a helpful side-effect: the bolts securing the brackets to the legs also secure the beams to the legs. Once a shelf has brackets installed, you can lift the BROR by the beams of that shelf without any risk of simply lifting the beams away from the legs.
Feet
Whether this last one is necessary depends on how level your floor is. The BROR has plastic feet at the base of the steel legs (probably to prevent damage to flooring) but they aren’t adustable. You might be mounting the BROR on uneven ground. This doesn’t have to be the rough concrete floor of a garage - the hardwood flooring of many condos has a significant gradient near the edge of the room.
I designed replacement feet that allow small adjustments to the height using a hex wrench.
Trick 4: Replace the BROR’s feet with adjustable ones.
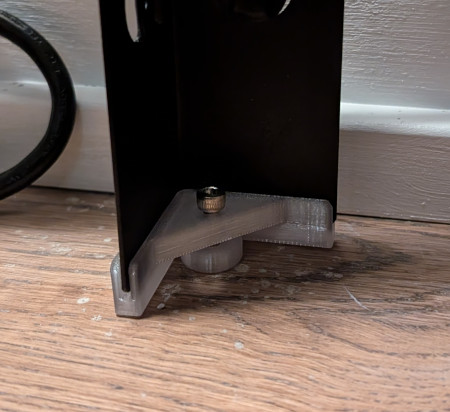
You’ll need a M4 bolt: I found 16mm-long ones were usually sufficient. Be sure to print both the foot (which goes on the bottom of the shelf) and the little ‘base’ that goes under the bolt to stop it scratching the floor.
The feet were quite fun to design. I got to use another trick from Rahix’ post: crush ribs. These allow the slot in the foot to snugly fit the leg, without having to precisely match the size of the slot to the thickness of the steel used in the leg. Instead, the ribs deliberately create small undersized regions that are crushed to exactly the right size when they are installed.
Summary and quick links
To make your BROR more robust:
- File down any ‘keyhole’ cutouts in the horizontal beams that do not fit.
- Bolt it to the wall.
- Reinforce the points where beams meet with 3D printed right-angle brackets.
- Replace the BROR’s feet with adjustable ones.
Links:
If you found this interesting, or have suggestions for improvements, I’d love to hear them. You can find out how to contact me via the contact page.
IKEA give a limit of 95kg per shelf for the BROR, vs 15kg for a typical bookshelf.↩︎
It’s possible that IKEA have got a lot better at this. I bought some second hand BRORs where about 1/3 of the keyholes either didn’t fit. But I’ve also bought new ones where the mostly fit pretty well.↩︎
In one case I needed the BROR to be mounted 90mm away from the wall to allow a sliding door to pass behind it, so I designed a bracket that provided exactly this standoff.↩︎
These modes would be prevented if the shelves attached firmly to the beams, but they don’t. Instead the shelves just sit on top. I get this as a design decision. Doing otherwise would mean drilling holes in both the shelves and the beams, and adding extra screws to the design. It would be total overkill for what these are intended for, which is garage storage.↩︎
The only reason there is any void left at all is to allow you to place the nuts that the screws / bolts will go into. I considered printing smaller hole and allowing the screw to tap into the plastic instead, but this would reduce the reusability of the design if it is disassembled and reassembled.↩︎
As Rahix’ post points out, any time the printer encounters a sharp corner in horizontal motion, it has to come to a near-standstill. Rounded corners (‘fillets’) on vertical edges therefore allow faster printing. It also avoid the ‘blobby’ effect often seen on sharp corners caused by the extrusion rate having to change as the print-head slows down.↩︎